Creating an Org Chart from a List
Creating an organization chart from a SharePoint list is a two stage process:
- Step one is creating a suitable list holding the data for the org chart.
- Step two is configuring the SharePointOrgChart web part to display the list.
The SharePointOrgChart web part can draw an organization chart from any SharePoint list that follows these rules.
- Has a Primary Key - a field that uniquely identifies each row. For example it could be a full name or more likely the SharePoint Person
- Has a Parent Field - a field that identifies the parent of this row. This could be a LookUp field or more likely the SharePoint Person
Create a custom list

In this guide we create a custom list called ProjectPeople.
To do this select More Options from the Site Actions Menu.
Next choose a Custom List, enter the name ProjectPeople and press the Create button.
Add column "Name" to the list


Now we will add two fields to the list.
From the List Ribbon select Create Column.
Then add a column called Name as a single line of text.
Create the "Manager Column

Add a column called Manager , choosing the type as LookUp and setting "Get Information From" list to ProjectPeople and "In this column" to Name.
It is important that the "Requires that this column contains information" is set to NO.
Populating the list


Now enter some information into the list. In the example shown a project manager called Jane Smith has been added. As she is the head of the project we have not selected a manager for her.
Next we add the people who report to Jane. In this example we add Tom and Mike who are responsible for testing and development both report to Jane.
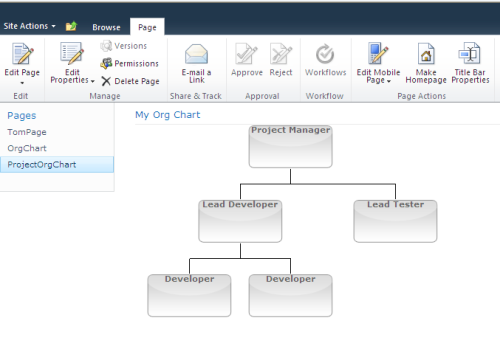
In the final list we have added two developers reporting to Mike. Now we are ready to configure the org chart.
Completing the list

In the final list we have added two extra developers reporting to Mike. Now we are ready to configure the org chart.
Create a web part page

Create a new page called ProjectOrgChart by selecting the Add Pages option from the Site Actions menu.
Add the SharePointOrgChart to the page

Select the OrgChart web part from Custom Categories and add the web part to the page.
Configure the Org Chart

Once added the org chart web part will require configuring. Click the link on the web part to open the tool pane.
You can use the wizard to configure the organization chart or alternatively you can exit the wizard and configure the chart by setting the correct configuration properties.
This guide assumes you have left the wizard and wish to complete the configuration manually.
Setting the configuration properties
In the Data Source configuration section of the tool pane set the Primary Key to Name and set the Manager property to Manager.
In the Data Source - List configuration section enter the name of the list name ProjectPeople into the URL field.
In the Chart Items configuration section enter Name into the Columns To Show property. This property tells SharePointOrgChart which list columns should be shown within the chart boxes.
Once you have entered these settings press Apply to complete the configuration.